

Getting Started with Kubernetes — Chapter # 02


Nodes:
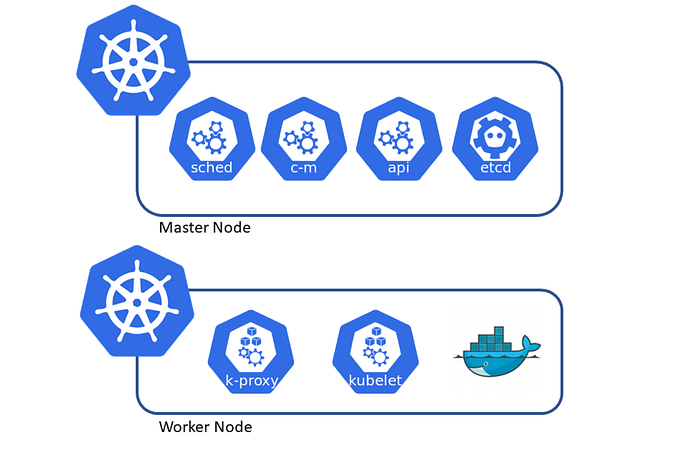
In K8’s, a group of servers is called a cluster. Kubernetes cluster consists of master node and worker nodes.Master node acts as a manager. Where, worker nodes are servers or system on which kubernetes deploys and run our application.
Following command is used to get list of nodes:
kubectl get nodes
To describe and get details of any node:
kubectl describe node <node-name>
e.g: kubectl describe node minikube
PODS:
In K8’s, to run any application first we have to containerized our application which is the basic condition. Kubernetes is not like docker with directly runs the container instead kubernetes first wrap our application into a container which is called a POD.
“Each Pod is like a separate logical machine with its own IP, host name, processes and so ,on running on a single application. All containers in a pod will appear to be running on the same logical machine.”

A Pod with multiple containers will always run on same worker node.In K8's pod helps to group multiple containers. K8's give concept of volumes in pods for sharing the file between containers in the pods.To define a POD one way is to define POD configuration in YAML file.
YAML file parts:
Type: POD, Jobs, Deployment, Other**
API Version: v1, v2 etc**Metadata: name, labels, namespace**Spec: pod’s containers, volumes, port expose

Following command is used to see the output of pod in YAML format:
kubectl get pods myfirstpod -o yaml
Here “o” means output
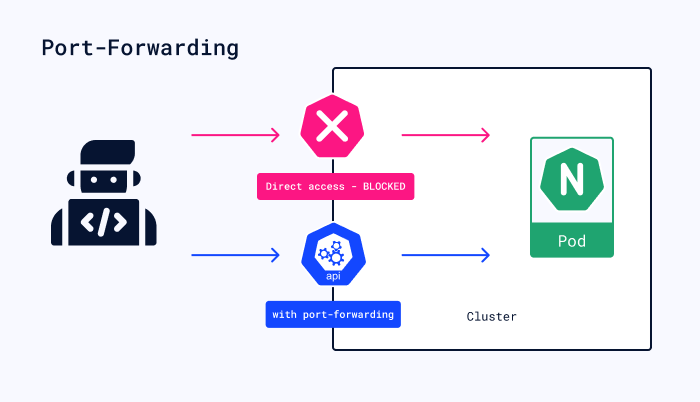
Port Forwarding:
There is a concept of port forwarding in K8’s which means to access and interact with internal resources of the cluster from your local machine. kubectl port-forward pod-name 6500:80 Here “6500” is extrernal port.
Create a POD:
Another way of creating a Pod is from CMD.
kubectl run mysecondpod --image=namespace/repositoryname --port=80 --restart=Never
kubectl run anotherpodwithlabel --image=namespace/repositoryname -- port=80 --restart=Never --labels=type=frontend, env=development
Following command is used to show the labels of pods:
kubectl get pods --show-labels
kubectl run pods -L env
kubectl run pods -L, env, type, run
Label POD at Runtime
kubectl label pods <pod-name> app=helloworld type=frontend
Example:
kubectl label pods myfirstpod app=helloworld type=frontend
To overwrite any Pod Label use this command:
kubectl label pods <pod-name> env=production — overwrite
Inorder to remove any label then use this command:
kubectl get pods myfirstpod app-
Here app is key of pod label and “-” (minus) is used to remove the label key.
Label Selector
Label selector can be used as a criteria for filtering any resources. Following command will show pods labels having type frontend only
kubectl get pods -l type=frontend
This command will show the pods having labels frontend and other labels.
kubectl get pods -l type=frontend --show-labels
This command will show the pods having labels not frontend.
kubectl get pods -l type!=frontend --show-labels
Or
kubectl get pods -l ‘type notin (frontend, backend)’ --show-labels
NameSpace
Namespace is a kind of virtual box which isolates containers resources with other namespace. Following are some commands with namespace function.

kubectl create namespace production
kubectl get ns
kubectl get pods -- all -namespace
To delete the pod, following command is used:
kubectl delete pod <pod-name>